kit For Learning Course
In this section, we will use the components in this kit to expand our learning, gradually mastering the principles and functional characteristics of each component in order of depth, and completing the corresponding program writing.
Course 1:Make the servo motor turn
Wiring diagram
MG90 Servo —— ESP8266 D4
Example code
#include <Servo.h>

Servo myservo;
#define SERVO_PIN D4

void setup() {
 myservo.attach(SERVO_PIN);
 myservo.write(0);
}

void loop() {
 myservo.write(180);
 delay(3000);

 myservo.write(0);
 delay(3000);
}
Achieved Effect
Connect the servo motor to pin D4; the servo motor will rotate 180° every 3 seconds.
You can use this program to sequentially switch between connecting 8 servos to test whether the servos are working properly.
Course 2:Rotate two servo motors
Wiring diagram
MG90 Servo —— ESP8266 D4
MG90 Servo —— ESP8266 D8
Example code
#include <Servo.h>

Servo myservo1;  // Pin D4 SERVO
Servo myservo2;  // Pin D8 SERVO

#define SERVO_PIN1 D4
#define SERVO_PIN2 D8

void setup() {
 myservo1.attach(SERVO_PIN1);
 myservo2.attach(SERVO_PIN2);

 myservo1.write(0);
 myservo2.write(0);
}

void loop() {
 // Both servos rotate 180 degrees simultaneously

 myservo1.write(180);
 myservo2.write(180);
 delay(2000);

 // Both servos return to 0 degrees simultaneously

 myservo1.write(0);
 myservo2.write(0);
 delay(2000);
}
Achieved Effect
Similar to the previous lesson, you only need to add one more servo and one more definition in the code to make both servos move simultaneously.
Course 3:Let the spider move forward
In the previous two lessons, we’ve already gotten two servos moving. Next, we’ll get all eight servos moving simultaneously to propel the spider forward.
Wiring diagram
Please connect the wires as shown in the diagram below.
Example code
#include <Servo.h>
#include <Arduino.h>
// Servo pin definitions
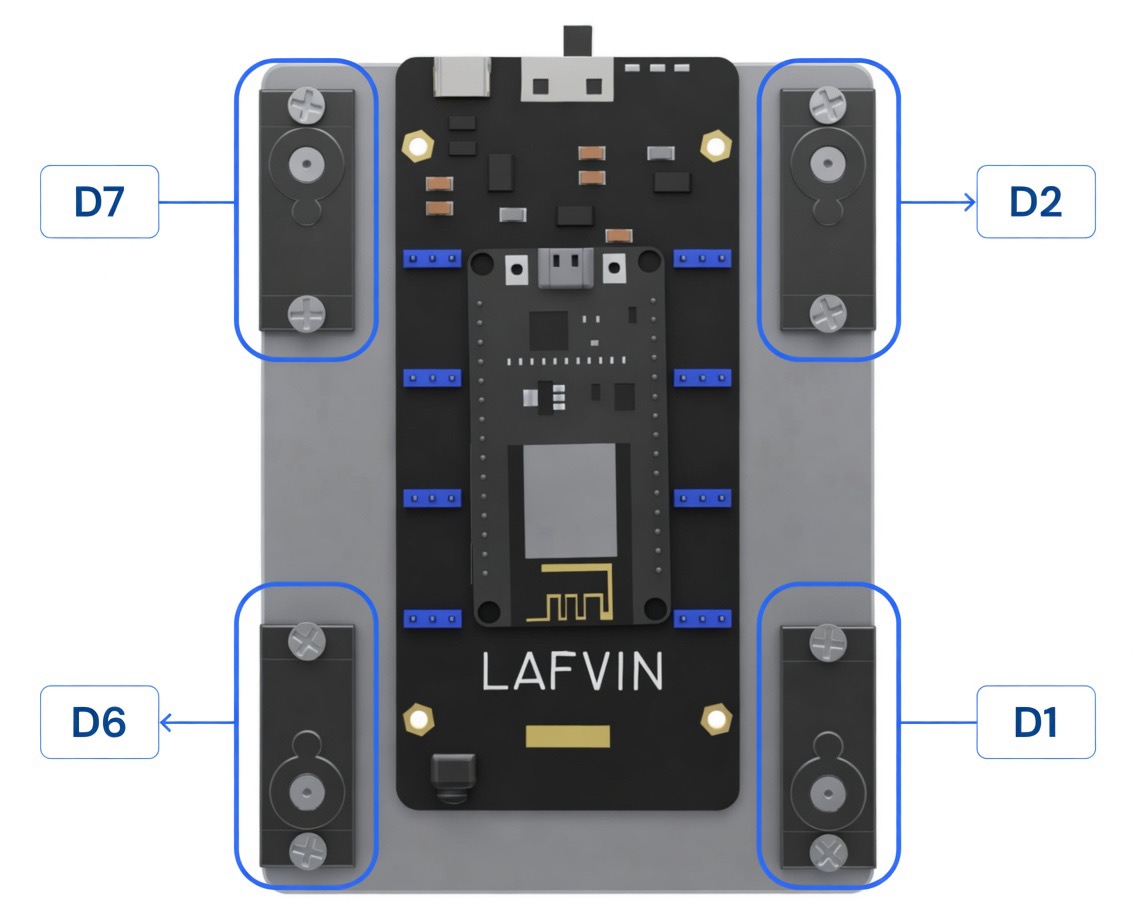
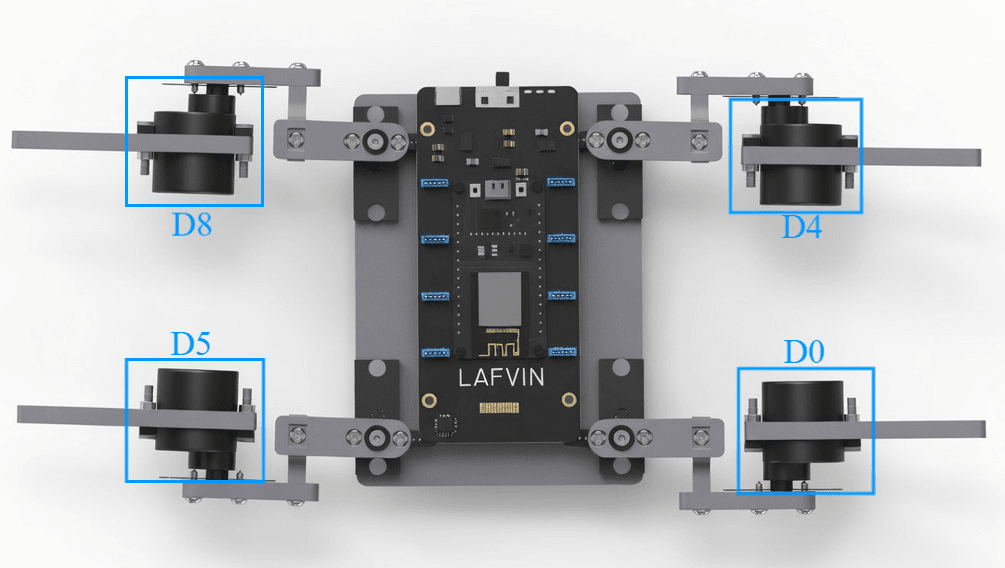
const int SERVO_PINS[] = {14, 12, 13, 15, 16, 5, 4, 2}; // G14, G12, G13, G15, G16, G5, G4, G2
const int ALLSERVOS = 8;
const int ALLMATRIX = 9; // 8 servos + time
// Servo angle range
const int SERVOMIN = 400;
const int SERVOMAX = 2400;
const int ANGLE_MIN = 1;
const int ANGLE_MAX = 180;
// Servo zero position
const int Servo_Zero[] = { 135, 45, 135, 45, 45, 135, 45, 135, 500 };
// Forward motion sequence
const int Servo_Forward_Step = 11;
const int Servo_Forward[][ALLMATRIX] = {
// G14, G12, G13, G15, G16, G5, G4, G2, ms
{ 70, 90, 90, 110, 110, 90, 90, 70, 200 }, // standby
{ 90, 90, 90, 110, 110, 90, 45, 90, 200 }, // leg1,4 lift up
{ 70, 90, 90, 110, 110, 90, 45, 70, 200 }, // leg1,4 put down
{ 70, 90, 90, 90, 90, 90, 45, 70, 200 }, // leg2,3 lift up
{ 70, 39, 141, 90, 90, 90, 90, 70, 200 }, // leg1,4 backward, leg2 forward
{ 70, 39, 141, 110, 110, 90, 90, 70, 200 }, // leg2,3 put down
{ 90, 90, 141, 110, 110, 90, 90, 90, 200 }, // leg1,4 lift up
{ 90, 90, 90, 110, 110, 135, 90, 90, 200 }, // leg2,3 backward
{ 70, 90, 90, 110, 110, 135, 90, 70, 200 }, // leg1,4 put down
{ 70, 90, 90, 110, 90, 135, 90, 70, 200 }, // leg3 lift up
{ 70, 90, 90, 110, 110, 90, 90, 70, 200 }, // leg3 put down forward
};
class SpiderBotMotion {
public:
Servo servos[8];
// Initialize servos
void init() {
for (int i = 0; i < ALLSERVOS; i++) {
servos[i].attach(SERVO_PINS[i], SERVOMIN, SERVOMAX);
}
delay(200);
}
// Move all servos to zero position
void zero() {
for (int i = 0; i < ALLSERVOS; i++) {
int angle = constrain(Servo_Zero[i], ANGLE_MIN, ANGLE_MAX);
servos[i].write(angle);
}
delay(Servo_Zero[8]);
}
// Forward motion
void forward() {
for (int step = 0; step < Servo_Forward_Step; step++) {
for (int servo = 0; servo < ALLSERVOS; servo++) {
int angle = constrain(Servo_Forward[step][servo], ANGLE_MIN, ANGLE_MAX);
servos[servo].write(angle);
}
delay(Servo_Forward[step][8]);
}
}
// Standby pose
void standby() {
int standby_angles[] = {60, 90, 90, 120, 120, 90, 90, 60};
for (int i = 0; i < ALLSERVOS; i++) {
int angle = constrain(standby_angles[i], ANGLE_MIN, ANGLE_MAX);
servos[i].write(angle);
}
delay(500);
}
};
SpiderBotMotion robot;
void setup() {
Serial.begin(9600);
Serial.println("QuadBot Starting...");
// 1. Initialize servos
robot.init();
// 2. Move servos to zero position on power-up
Serial.println("Moving to zero position...");
robot.zero();
delay(500);
// 3. Enter standby state
Serial.println("Standby position...");
robot.standby();
delay(500);
Serial.println("Ready! Robot will move forward.");
}
void loop() {
// Execute forward motion repeatedly
robot.forward();
delay(100);
}
Achieved Effect
The spider robot will now continuously perform forward movement.
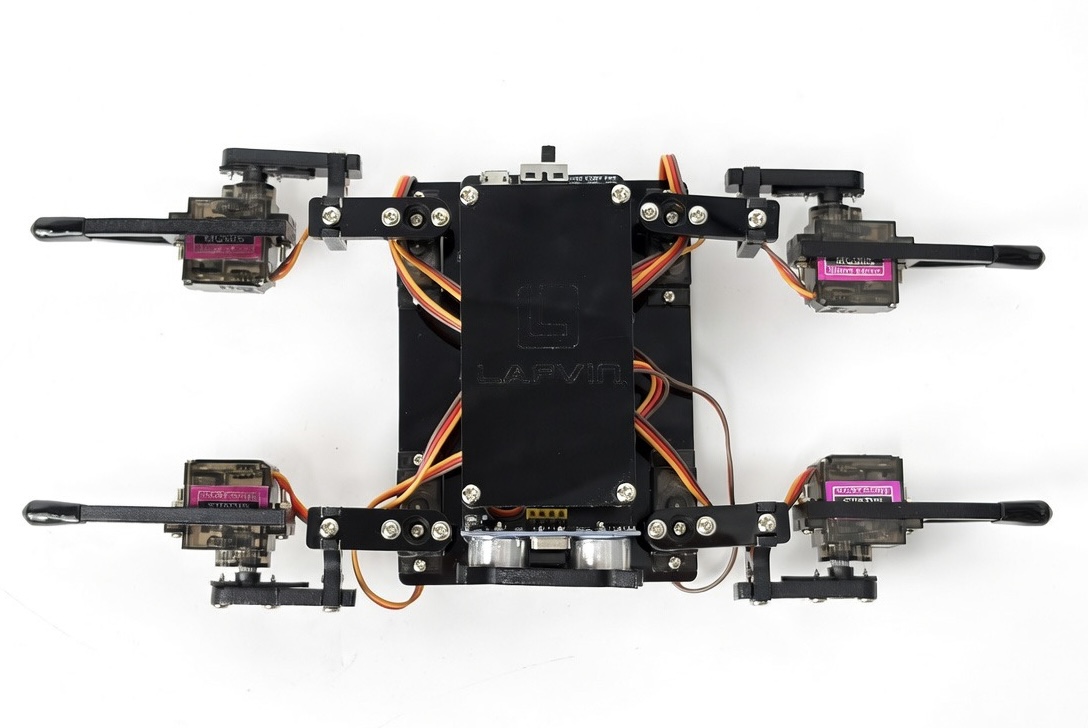
If the spider robot’s forward movement is abnormal, ensure that the spider robot’s initial installation position is as shown below, and click here to jump to the servo calibration page. Servo calibration and debug
Since the code here only contains forward motion, the servo cannot be calibrated using the app; you only need to check the manual servo calibration section.
Course 5:Infrared Control Servo
In this lesson, we will control a servo motor using an infrared remote control.
Wiring diagram
SERVO1-D4
SERVO2-D8
Example code
#include <ESP8266WiFi.h>
#include <IRrecv.h>
#include <IRutils.h>
#include <Servo.h>

// ===== Pin Definitions =====
#define IR_RECEIVE_PIN D3
#define SERVO1_PIN D4
#define SERVO2_PIN D8

// ===== IR Key Mapping =====
#define KEY_1 0x16
#define KEY_2 0x19

// ===== Servo Objects =====
Servo servo1;
Servo servo2;

// ===== IR Receiver Object =====
IRrecv irrecv(IR_RECEIVE_PIN);
decode_results results;

// ===== Key Mapping Function =====
String getKeyName(uint32_t code) {
  switch(code) {
    case KEY_1: return "1";
    case KEY_2: return "2";
    default: return "";
  }
}

// ===== Control Servo Function =====
void controlServo(String key) {
  if (key == "1") {
    servo1.write(180);
    delay(500);
    servo1.write(0);
  }
  else if (key == "2") {
    servo2.write(180);
    delay(500);
    servo2.write(0);
  }
}

// ===== Setup =====
void setup() {
  // Attach servos
  servo1.attach(SERVO1_PIN);
  servo2.attach(SERVO2_PIN);

  // Initialize servos to 0 degrees
  servo1.write(0);
  servo2.write(0);

  // Initialize IR receiver
  irrecv.enableIRIn();
}

// ===== Main Loop =====
void loop() {
  // Detect IR signals
  if (irrecv.decode(&results)) {
    uint32_t command = results.command;
    String key = getKeyName(command);

    // Try using value's lower 8 bits if command mapping fails
    if (key == "") {
      key = getKeyName(results.value & 0xFF);
    }

    if (key != "") {
      controlServo(key);
      delay(100);
    }

    irrecv.resume();
  }
}
Achieved Effect
Pressing the number 1 and number 2 buttons on the infrared remote control will cause the two servos to rotate 180 degrees each.
Course 6:ESP8266 Rangefinder
In this lesson, we will make full use of the built-in Wi-Fi function of the ESP8266 development board and combine it with an ultrasonic distance sensor to make a rangefinder.
Wiring diagram
Ultrasonic Distance Sensor |
Spider Robot Expansion Board |
|---|---|
VCC |
5V |
GND |
GND |
TRIG |
TX |
ECHO |
RX |
Attention
Do not connect the ultrasonic distance sensor when programming the code, as this will cause a serial port conflict and prevent the code from being programmed.
Example code
#include <ESP8266WiFi.h>
#include <ESP8266WebServer.h>

// WiFi hotspot configuration
const char* ssid = "ESP8266-Distance-Meter";
const char* password = "12345678";

// Using RX/TX pins (GPIO1 and GPIO3)
#define TRIG_PIN 1   // GPIO1 (TX pin)
#define ECHO_PIN 3   // GPIO3 (RX pin)

// Web server
ESP8266WebServer server(80);

// Distance variables
float distance_cm = 0.0;
unsigned long lastMeasurement = 0;
const unsigned long MEASURE_INTERVAL = 100;
bool measurementError = false;
unsigned long measurementCount = 0;

// Ultrasonic measurement function
float measureDistance() {
  // Send trigger pulse
  digitalWrite(TRIG_PIN, LOW);
  delayMicroseconds(2);
  digitalWrite(TRIG_PIN, HIGH);
  delayMicroseconds(10);
  digitalWrite(TRIG_PIN, LOW);

  // Measure echo time
  unsigned long duration = pulseIn(ECHO_PIN, HIGH, 30000); // 30ms timeout

  if (duration == 0) {
    return -1.0;
  }

  // Calculate distance
  float distance = duration * 0.0343 / 2;

  // Valid range check
  if (distance > 400.0 || distance < 2.0) {
    return -1.0;
  }

  return distance;
}

// Clean HTML page - white background, black text, only distance
const char* htmlPage = R"rawliteral(
<!DOCTYPE html>
<html lang="en">
<head>
    <meta charset="UTF-8">
    <meta name="viewport" content="width=device-width, initial-scale=1.0">
    <title>Distance Meter</title>
    <style>
        * {
            margin: 0;
            padding: 0;
            box-sizing: border-box;
        }

        body {
            font-family: 'Courier New', monospace;
            background: white;
            min-height: 100vh;
            display: flex;
            justify-content: center;
            align-items: center;
        }

        .container {
            text-align: center;
        }

        .distance {
            font-size: 200px;
            font-weight: bold;
            color: black;
            font-family: 'Courier New', monospace;
        }

        .unit {
            font-size: 48px;
            color: black;
            margin-left: 10px;
        }

        @keyframes blink {
            0% { opacity: 1; }
            50% { opacity: 0.6; }
            100% { opacity: 1; }
        }

        .update {
            animation: blink 0.2s ease;
        }

        @media (max-width: 600px) {
            .distance {
                font-size: 100px;
            }
            .unit {
                font-size: 32px;
            }
        }
    </style>
</head>
<body>
    <div class="container">
        <div class="distance">
            <span id="value">0.0</span><span class="unit">cm</span>
        </div>
    </div>

    <script>
        function updateDistance() {
            fetch('/data')
                .then(response => response.json())
                .then(data => {
                    const valueSpan = document.getElementById('value');

                    if (data.error) {
                        valueSpan.innerHTML = '--';
                    } else {
                        valueSpan.innerHTML = data.distance.toFixed(1);

                        // Add animation effect
                        valueSpan.classList.add('update');
                        setTimeout(() => valueSpan.classList.remove('update'), 200);
                    }
                })
                .catch(error => {
                    document.getElementById('value').innerHTML = '--';
                });
        }

        // Update every 300ms
        setInterval(updateDistance, 300);
        updateDistance();
    </script>
</body>
</html>
)rawliteral";

// Handle root path
void handleRoot() {
  server.send(200, "text/html", htmlPage);
}

// Handle data request
void handleData() {
  String json = "{";

  if (measurementError || distance_cm < 0) {
    json += "\"error\":\"Out of range\"";
    json += ",\"distance\":0";
  } else {
    json += "\"error\":null";
    json += ",\"distance\":" + String(distance_cm, 2);
  }

  json += ",\"count\":" + String(measurementCount);
  json += "}";

  server.send(200, "application/json", json);
}

// Handle not found
void handleNotFound() {
  server.send(404, "text/plain", "404: Not Found");
}

void setup() {
  // Note: Serial.begin() not called to avoid RX/TX conflict

  // Initialize pins
  pinMode(TRIG_PIN, OUTPUT);
  pinMode(ECHO_PIN, INPUT);
  digitalWrite(TRIG_PIN, LOW);

  // Create WiFi hotspot
  WiFi.mode(WIFI_AP);

  // Configure AP parameters
  IPAddress local_ip(192, 168, 4, 1);
  IPAddress gateway(192, 168, 4, 1);
  IPAddress subnet(255, 255, 255, 0);

  WiFi.softAPConfig(local_ip, gateway, subnet);
  WiFi.softAP(ssid, password);

  // Setup web server
  server.on("/", handleRoot);
  server.on("/data", handleData);
  server.onNotFound(handleNotFound);

  server.begin();
}

void loop() {
  server.handleClient();

  // Periodic distance measurement
  unsigned long currentMillis = millis();
  if (currentMillis - lastMeasurement >= MEASURE_INTERVAL) {
    float measuredDistance = measureDistance();

    if (measuredDistance > 0) {
      distance_cm = measuredDistance;
      measurementError = false;
      measurementCount++;
    } else {
      measurementError = true;
    }

    lastMeasurement = currentMillis;
  }

  delay(10);
}
Achieved Effect
After the code is successfully burned, connect the ultrasonic distance sensor to the expansion board and press the “RST” button on the ESP8266.
Turn on your phone’s Wi-Fi, find and connect to a Wi-Fi network named: ESP8266-Distance-Meter with the password: 12345678.
After successfully connecting to Wi-Fi, open any browser on your phone and enter the IP address: 192.168.4.1 to access the distance measurement display page.